Keeping a consistent aspect ratio among images for the web can be a daunting task, especially when the desired crop size doesn't quite fit the focal point of the desired image/photo.
Below are some suggestions on what you can do, and what you should avoid.
Tip #1
Create a crib sheet/reference table of proportionate sizes. In excel or a google spreadsheet, generate a basic table identifying multiples/proportions of the suggested aspect ratio. For example,
| Approx Percentage of Recommended Crop Size | (Multiplier) | Width (pixels) | Height (pixels) |
|---|---|---|---|
| *25% | 0.25 | 200 | 100 |
| *50% | 0.50 | 400 | 200 |
| 100% | 1.00 | 800 | 400 |
| 150% | 1.50 | 1200 | 600 |
| 200% | 2.00 | 1600 | 800 |
| 400% | 4.00 | 3200 | 1600 |
Keep this type of tool handy to determine your mask dimensions for cropping.
Tip #2
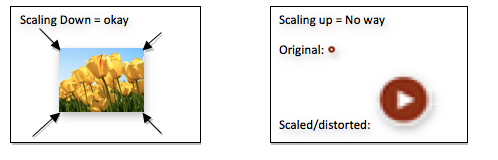
Create a layer with a rectangle drawn at the desired crop dimensions. Use it as a mask, overlaying the image and moving it around to identify what would remain after cropping. Generally, it's easier to CROP BEFORE SCALING an image down. AVOID upscaling!
Approaches to fitting a square peg in a round hole
Working with images whose original size is not compatible at 100% scale
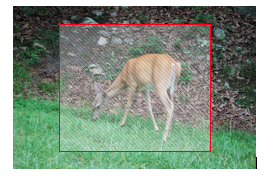
Scenario A: Original image size is larger than desired crop
Utilize a mask that is proportional to the desired crop size and appropriate for the image you are looking at. Move it around until you find a feasible region to crop, maintaining your desired focal point(s). Crop the image. Then scale the image down.
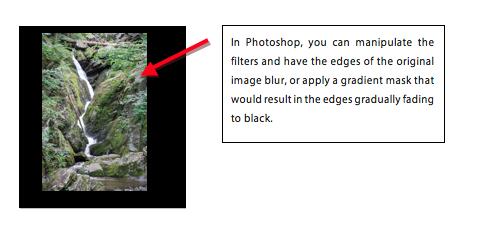
Scenario B: Original image size is smaller than desired crop
You should never upscale an image- it would introduce pixelation and distortions to the rendered view. Sometimes, you can infill the canvas background with a solid color and let the edges of the image bleed to a solid color. The overall physical canvas size should correspond to your physical crop. When using this approach, try to keep consistency in alignment of the image. Should smaller images be centered both vertically and horizontally, bleeding to black like a picture frame? Or should they always be top and left aligned, with black infilling below and to the right?
For images where bleeding to a solid color on the canvas backdrop is not a solution, you should raise the issue to supervisors/content editors to determine if it's absolutely necessary to use and whether there are alternatives to the smaller sized image.
If it is absolutely necessary to use the image, can it be inserted into the content on the page using a different size, with content wrapping to the left or right of it? First try using one of the other recommended sizes; otherwise crop and scale as needed to be a size that will not result in awkward text wrapping (for example, you wouldn't want an image that takes up 90% of the horizontal space, and text 10%; generally you'll want to think of the content container in fractions/columns in terms of thirds, quarters, or fifths).
Working with images whose orientation is different from the desired orientation
If the original image is large enough, you might be able to utilize a mask and find a suitable region to crop to as discussed in Scenario A above. If the image is too narrow or too short, then you should consider Scenario B above as well.
Batch processing multiple images of the same original size
If you have multiple images that need to be scaled, cropped, or cropped and scaled, Photoshop and other image editing software offer a “batch process” feature. It’s usually listed under the File submenu. Be wary of overwriting your original images when applying a batch process- you should instead rename the new processed images or place in a separate folder. Be sure to scan/double check the processed images, especially if a crop operation was involved.